Friday, June 15, 2012

A Summer Moment

Today we had a cozy little moment in our backyard...
We had bon bons, pretty little cookies, and cream soda. Yumm!
We tested out one of our floor cushion,
 enjoyed fresh strawberries,
 and enjoyed the beautiful weather! 
 Stick around, and I'll share the recipe for these 
darling sugar cookies, sometime in the next week!

I'll also share how to make the bons bons, 
and these darling burlap and lace pom poms!
Won't you come eat sweets with me awhile?! ;)

Have a lovely weekend!!

-Sylv

Thursday, June 14, 2012

Sheer Flower Tutorial

Remember this pacifier clip from last week?
Well today I'm showing you how to make the sweet lil flower on it. 

Supplies Needed:

Small Piece of Sheer Fabric
Needle and Matching Thread
A Felt Ball, Button, or Bead


Using sheer fabric (I just grabbed a lil piece from my scrap bin),
 cut out 5 small petals about 1 1/2" tall.

For the center, you can use a button, a bead, or a felt ball.
I did a felt ball tutorial here yesterday.
 
 Using a paint brush or your fingers, smear a little bit of fray check
onto all edges of each petal.
 Don't get too carried away with the stuff, 
or your edges will be really stiff and glossy!
  Using a needle and thread, sew along the bottom of each petal
a small stitch, a large stitch, and then another small stitch as shown.
Continue the same pattern of stitching through all the petals 
and pull the string tight so the petals are all together...
Sew the first and last petals together making a circle of the thread.
Then sew your ball into the center of the flower, 
going down through the flower and back up 
as you would sew on a button. 
 Knot your thread in the back, and that is all! 
This flower is cute on lots of things.
You could sew it onto a pacifier clip like I did, or hot glue it onto a
hair clip or pin. You could use it as a gift topper, or on a headband.
So many ideas... :)

Have fun! :)

-Sylv

Wednesday, June 13, 2012

Little Girls Purse

Finally something new for the shop! :)


 This sweet little purse is a small version of our larger laptop bag. 


You can check out both bags here in our shop.


Thanks for reading my lil blog! :)

-Sylvie

Felted Wool Ball Tutorial

My first attempts at making felt balls I well, I just couldn't get it.
The felt balls turned out lumpy, lopsided, and had cracks.
I would sit there with a felting needle for hours, poking at them until they were perfect. 
I wondered how people sell them for cheap when they're so hard to make!
(You can find some for sale here.)
I tried many times before I mastered it. 


Here is how it's done...


All you need is a small piece of wool roving (I get mine here),
dish soap, hot water, and cold water.

Pull a piece of roving off, a few times larger than
size you'd like your ball to be.
  Roll the roving into a ball...
First starting with small folds,
 And then wrap the last bit of fluff around the outside.
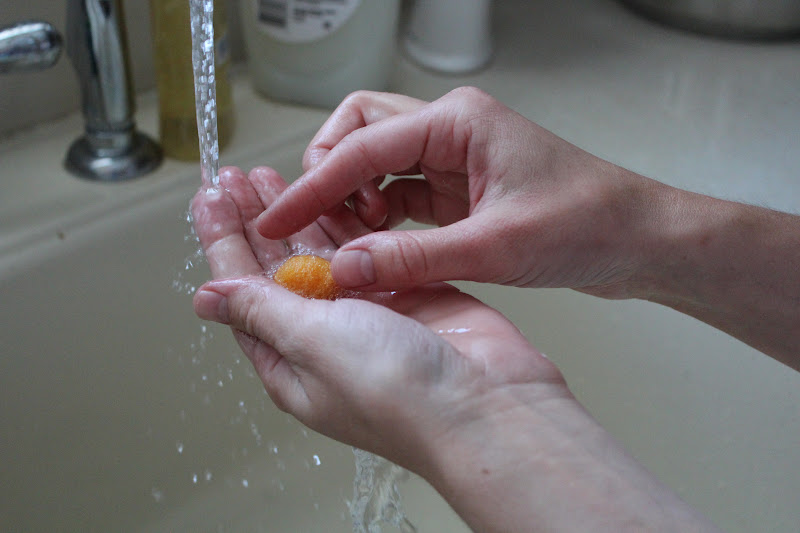
 At the sink, run hot water (as hot as you can stand to touch),
and put a drop of dish soap into your hand.
I have used many different types of dish soap,
and they all worked well!
 Then put a little hot water in your hand and gently 
roll the roving in the soapy water.
 Help the ball to stay round by gently rolling it in your fingers.

Here is where I was messing up... 
The wool needs to be rolled extremely gently at first. 
Really, hardly press on it at all, just tumble it 
around and coax it into a ball! 

Then, holding it in your palm again, splash 
cold water onto it and gently roll it again.
 Continue rolling and soaking the ball, alternating: 
hot water, roll, cold water, roll, hot water, roll...
Once your ball is more firm and has shrunk, 
press harder as you roll.
 If you want your ball slightly smaller, 
continue the process a little longer. 
And you are finished!

Lay your wool ball on a towel overnight to dry.

You can use felt balls in jars as decor, as the center of handmade flowers (like I did here),  string them into a garland, and many
other fun things! Good luck and have fun! :)

-Sylvie


P.S. Many tutorials suggest using a bowl of hot water
and a bowl of cold water. I found that I get better results using
tap water, because the hot water is always hot, and the cold
is always cold (rather than sitting there cooling/ warming).

Monday, June 11, 2012

I Am Thankful For...

Poppies...

Summertime is finally here full blast!

Watching the flowers blowing in the warm summer breeze 
gives an overwhelming sense of contentment.


There is something so peaceful about nature.


Here are a few of my favorite poppy finds...

Organic Cotton T-shirt with Poppies - Women's Scoop Neck GreyiPad Sleeve, Poppy Screen Print with Yellow Flower Lining, iPad Case
felt poppy brooch / SLEEPING BEAUTY pink / felted flower brooch / made to orderVintage bicycle digital download image Basket Orange Poppies with or without Paris Streets transfer to fabric paper pillows burlap No. 586


Have a good week! :)

-Sylvie

Saturday, June 9, 2012

Doily Pacifier Clip Tutorial

It is the middle of the night and I am rummaging around the house, bleary-eyed, dumping out the toy boxes, peering under beds, emptying the diaper bag... there it is! In the bathtub! Phew. Stuff it in the mouth and crawl back into bed. 

For every pacifier in the house, there needs to be a clip.
The one pacifier that has one is so much easier to keep track of.
The ones at Target are just so boring though!
Just a piece of ribbon and I'm supposed to pay $10+?!?
Unacceptable. :)


So lets make one! :)

Here is a pacifier clip I made for my little girl, 
that is much cuter and cheaper than others I've found in stores!
I used a flower and some snaps from my stash, 
some Lace on a Roll and a clip from the jewelry section at Michaels.
 First, cut a piece of the lace to 12". 
Then, thread the lace through the loop on the clip. 
If you get this exact same lace on a roll, it is sticky backed,
 so just stick the pieces together.
 If you are using other type ribbon, just put some super glue in 
between and press the layers together. 
Any flower will work. Or button... As long as it is not a size that 
will be a choking hazard if it should fall off. 
An extra extra large size button would be cute!
I chose to use this flower from my stash of flowers.
 Using a needle and thread, 
sew the flower or button onto the lace just below the clip.
 Then using glue and tweezers, fold and glue the raw end of the 
lace. If you are using regular ribbon, just singe it with a lighter.
 Then sew a snap onto the back side of the lace, on the opposite end 
from the flower. The sides of the snaps should be 2" apart. 
 That is all! 
Snap on a pacifier, clip to baby's shirt, and cross your fingers that 
this pacifier won't get lost! :)
Do you like the little flower? It is super simple to make... I will be 
sharing a tutorial of it sometime next week, so come back and 
check out how easy it is! :)


Have a good wknd!


-Sylvie

Tuesday, June 5, 2012

Dahlia Birthday Cake

We had a little girl birthday in our home a lil while ago...

I had so much fun making her a dahlia cake.
I've seen a few people around the web make smaller versions of this on cupcakes and I thought it'd be fun in a bigger scale!


 It was pretty simple to make.


 I just baked, stacked, and frosted two round cakes, and then arranged the petals in top.

The petals are made from large marshmallows.

Just use scissors to cut them in half on a diagonal,
 and then dip the sticky inside into sugar sprinkles.

Arrange them onto fresh frosting so that they stick,
add some decorative sprinkles to the center, 
and you're finished! 


It's a simple and cheap way to fancy up a plain cake, and I'm sure almost any little girl would be pleased to get such a pretty cake! :)

You could use mini marshmallows on cupcakes, 
or even experiment with those huge marshmallows 
that have been in stores lately! 

Any questions? Feel free to ask! :)

Enjoy!

-Sylvie

Monday, June 4, 2012

Crazy Busy Life

Phew! We have been so busy these days!

We took a trip to stay with husband's parents in Upper Michigan.
There are so many interesting spots at their farmhouse.
Isn't this lil ol' wheel barrow cute in front of the sauna!?
 We were away for almost a week,
 and now we are home and my sweetheart is finally back to work...
 We are so thankful for his recovery! 
 He still isn't completely healed, but is doing very well! :)
 It was strange to not have him home today,
 but I sure am looking forward to having some normalcy again! :)
Hopefully with a normal routine back, I will get some juicy projects accomplished to share with you! :) 

Thanks for reading!!

-Sylv