Friday, April 27, 2012

Toddler Buttoning Activity Tutorial

Here is a simple activity for toddlers... 
It builds coordination, it teaches them buttoning, and it is quiet.


This is how I made it...

I used my Accuquilt Go! fabric cutter to cut out a stack of flowers.
I cut them from wool felt using the Rose of Sharon cutter. 
Wool felt will hold up better than cheaper acrylic felt.


Then, I tied the ends of a 10" piece of ribbon to the buttons.
Tie them in double knots, and heat the knots with a lighter to help them stay in place.


Then, I cut small buttonholes in the flowers.


Now your little one can thread them on and off of the ribbon! 


This is a perfect toy for in church, or any quiet place! 

Happy Friday!

-Sylv

Thursday, April 26, 2012

Easy Doily Pillow Tutorial


Yesterday I made this pillow for a friend of mine.

It was super easy and is definitely 
something a beginner sewer could whip out.

Here is what I did...  

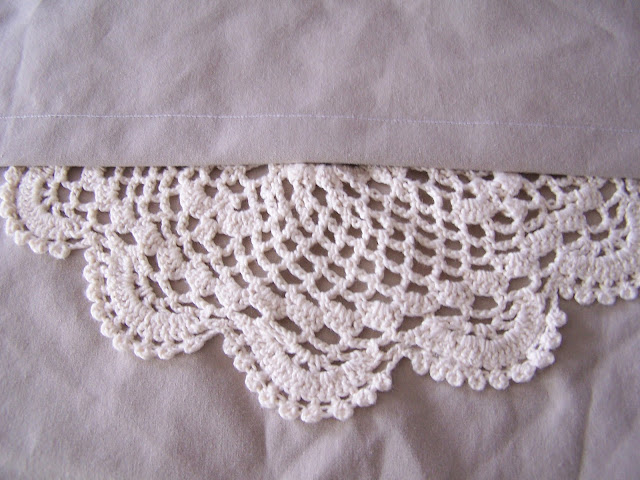
I used a doily, some cotton (from a clearance sheet I picked up), and a pillow that I was done with. 
I also used my sewing machine, rotary cutter, and mat.


First, measure your pillow. 
You want to cut one square that size plus 1" seam allowance, and two squares about 2/3 the height and the same width.

My pillow was 15"x15" 
so I cut one 16"x16" and two 11"x16" squares.


Next, on one 16" side of the smaller pieces,
 fold down 1" and press all the way across.  


Fold your edge over 1" again, and press again.
Repeat with both of the smaller pieces. 


Now sew the folds into place.


If you have brand tags, now is a good time to add them near your completed hem.


Onto the your front square piece, pin your doily to the center.


Now using your sewing machine, sew around the edges, 
and sew a smaller circle in the middle, securing it in place.
I followed the shape of the doily, so the stitches are more hidden.


Stack your pieces up, with right sides facing each other,


and the hems you finished going across the middle. 
Make sure that the tag piece is the one that is closest to the doily.


Now pin around the edges,


and sew the outside edges using a zigzag stitch, 
or if your machine has a serge-like stitch, use that. 
I used a stitch on my machine that looks similar to the letter E. 
Snip the corners slightly, to help turn them out. 


Turn it inside out around your pillow, 
and you are finished! Good job! 


Happy pillow-making! 
Enjoy!

-Sylvie 


I linked this post to...

Scrap Bin Project: Stuffed Foxes

The scrap bin was beginning to bulge.
So I made these for the kids...
I used this free pattern from matsutake
They are one of the easiest stuffed animals I have ever made! 
The kids love them, and the scrap bin is thinner! :)

Enjoy your day! 

-Sylv

Wednesday, April 25, 2012

Cake Batter Ice Cream Recipe

My mom gave us an ice cream maker last summer.
After experimenting with a few recipes, 
we have settled on a favorite that we make most often.  


This recipe tastes just like Coldstone's Cake Batter Ice Cream! 


Ingredients:

1 cup 2% milk
1/2 cup sugar
2 cups heavy cream
1 tsp vanilla extract
3/4 cup vanilla cake mix

Directions:

Whisk together milk and sugar to dissolve sugar.
Stir in remaining ingredients until no lumps remain.
Run in ice cream maker 35 minutes. 
Serve immediately. 

Enjoy!! 

(Remember to remove ice cream from the freezer bowl as soon as it is complete!)
                                  
                                                      -Sylvie


Tuesday, April 24, 2012

Silky Flower Tutorial


When I need a little therapy for my mom-brain,
and I don't have much time,
I make flowers of all kinds. 
They are fast, easy, and they make me smile.

They especially make me smile when they are free projects! 

Have any old silky shirts in the back of your closet?
(This one was 100% polyester, it worked very well)
Lets get started...

First, cut flower shapes from the flat panels of the shirt. 
They don't need to be perfect- once singed, it won't matter.
 
Carefully singe all raw edges by holding near a flame.
Once you are done with the petals, find a center piece.
I used another singed piece of fabric I had laying around,
and a vintage button from my button stash...
Stack the petals however they look nice, placing the centerpiece in the middle, and sew the stack together tightly. 
And... you are done!! 

These are fun to sew onto baby hats,
baby headbands, 
pins for scarves or jackets, 
or even just tape it to a pot!  

Happy flower-making! 
Enjoy! 

P.S. Thank you Grandma, for the shirt!! :)

                                                                                                        -Sylvie


I linked this post to...


Monday, April 23, 2012

Soft and Chewy Molasses Cookies

Ok, I have a confession... 


Just between you and me,
we I have a sugar addiction.
And we I love to bake.
I need professional help.


Ok, phew, I'm glad I got that out! 


Today I am sharing a favorite cookie recipe here at our house...


Soft and Chewy Molasses Cookies...


Ingredients:


1 1/3 cup cooking oil
2 cups brown sugar
2 eggs
1/2 cup molasses
4 cups flour
1 tsp. salt
4 tsp baking soda
1 tsp cinnamon
1 tsp ginger


Directions:


Preheat oven 350 degrees.
Mix oil, sugars, eggs, and molasses until creamy.
Add remaining ingredients and mix until combined. 
Roll balls of cookie dough in white sugar and drop onto ungreased cookie sheet (I use my melon-baller).
Bake 8-12 min.


NOTE: My oven is convection and these cookies turn out perfect at 8-9 minutes of baking. When they just begin to show dark around the edges (like above image), they are just right. 


Enjoy!! :)
                               -Sylv


Saturday, April 21, 2012

Kids Artwork

The kids love to be creative, and the fridge 
can be easily overwhelmed with all of their work.
Here is our solution...
Rather than keeping all the giant paintings they create, 
we cut them into smaller art, 
and hang them on the wall for a while. 

The kids think its great, and my kitchen doesn't feel so cluttered! 
Everybody is happy! :)

Thursday, April 19, 2012

Some Inspiration For Ya

Garage sale season is here!!! 
Get out there and find some bargains! :)

On my way home from town this morning, I stopped at a sale.

LOOK what I found!! 
What is that? It is a super nice, gorgeous, brand new, quality, lovely, nifty, awesome, ok you get it, kitchen faucet.

Know why I am over the moon about it? 

Just yesterday I saw it in a magazine and had 
this little wish that I could afford this very one!!

And I got it for $35. It is $529.00 new!!!! 
It is from Danze. You can find it here.

So the moral of the story is... Its time to garage sale! 
Finds like these are what keep me going, 
so I thought I'd share my motivation with ya! :)

Wednesday, April 18, 2012

Bathroom Before and After

This is an old project, but since we aren't getting much new projects done lately, I'll share some projects from the past...
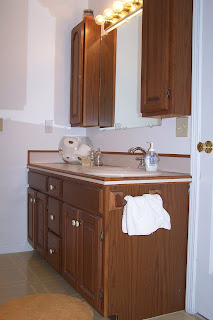
When we moved into our home, our bathroom looked like this.
I don't think it was updated since the house was built.
The linoleum was yellowed and peeling. 
The toilet seat was one of those that lets stored bathroom air out onto the back of your legs every time you sit down. 
The Hollywood strip light just didn't cut the mustard in my book...

So we (meaning my hubby) tackled it.
So much better! He did everything himself. New tile floor, new lighting, plumb in another sink, install sinks, install new toilet, replace outlet covers and bathroom fixtures... 

 We used the cabinets from either side of the sink to make a new one above the toilet. I painted the walls. I painted over the lovely shell border on the top of the shower tiles.
Finishing touches were a new shower curtain, 
bath mat, mirror, and window curtain.
Here is another before and after for the dramatic effect...
 
 
Don't I have the best husband!! :)